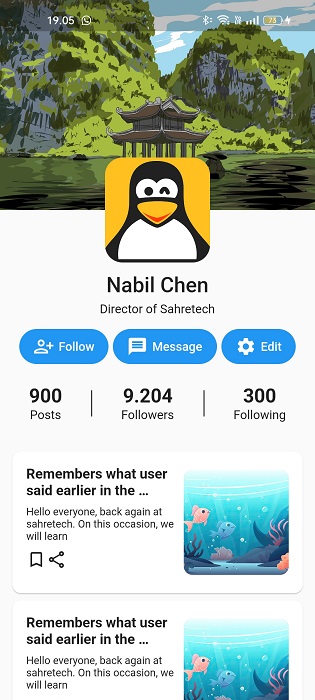
Tampilan Halaman Profile Keren di Flutter. Tampilan Halaman Profile dengan
Card dan Container List View di Flutter, Tampilan Profile di Flutter. Membuat
Tampilan Profile Keren dan Cantik di Flutter. Membuat Tampilan Card dan
Profile di Flutter. Flutter UI Card. Membuat Tampilan Cepat dan Mudah di
Flutter. Script Membuat Profile Page di Flutter Secara Cepat. Penggabungan
antara List View dan Widget Lain Flutter, Membuat Tampilan Android
Profesional, Flutter Template Design. Flutter List View Simple Design, Flutter Login Design Fresh & Modern, Flutter News Grid Design, Tampilan Halaman Grid View List Product Flutter,
Flutter Vertical dan Horizontal Scoll Design
1. Buat sebuah project baru flutter lalu copy script di bawah ini di dalam lib/main.dart
import 'package:flutter/material.dart';
void main() {
runApp(const MyApp());
}
class MyApp extends StatelessWidget {
const MyApp({Key? key}) : super(key: key);
@override
Widget build(BuildContext context) {
return MaterialApp(
debugShowCheckedModeBanner: false,
title: 'Profile Page',
theme: ThemeData(primarySwatch: Colors.blue),
home: const ProfilePage(),
);
}
}
class ProfilePage extends StatefulWidget {
const ProfilePage({Key? key}) : super(key: key);
@override
State<ProfilePage> createState() => _ProfilePageState();
}
class _ProfilePageState extends State<ProfilePage> {
@override
Widget build(BuildContext context) {
return Scaffold(
body: ListView(
padding: EdgeInsets.zero,
children: [
Container(
width: double.infinity,
height: MediaQuery.of(context).size.height * 0.30,
decoration: BoxDecoration(
// color: Colors.grey[400],
image: DecorationImage(
image: NetworkImage(
'https://cdn.pixabay.com/photo/2021/09/03/00/51/temple-6594770_1280.jpg'),
fit: BoxFit.cover),
)),
Transform.translate(
offset: Offset(0.0, -120 / 2.0),
child: Center(
child: Column(
children: [
Container(
width: 120,
height: 120,
decoration: BoxDecoration(
borderRadius: BorderRadius.all(Radius.circular(20)),
image: DecorationImage(
fit: BoxFit.cover,
image: NetworkImage(
'https://cdn.pixabay.com/photo/2016/03/31/19/56/avatar-1295399_640.png'))),
),
SizedBox(
height: 12,
),
Text(
'Nabil Chen',
style: TextStyle(fontSize: 24, fontWeight: FontWeight.w500),
),
SizedBox(
height: 5,
),
Text(
'Director of Sahretech',
),
SizedBox(
height: 15,
),
Row(
crossAxisAlignment: CrossAxisAlignment.center,
mainAxisAlignment: MainAxisAlignment.center,
children: [
Container(
height: 40, // Atur tinggi Container sesuai kebutuhan Anda
decoration: BoxDecoration(
color: Colors.blue,
borderRadius: BorderRadius.circular(25),
),
child: ElevatedButton(
onPressed: () {
// Implement your button action here
},
style: ElevatedButton.styleFrom(
primary: Colors.transparent,
shadowColor: Colors.transparent,
shape: RoundedRectangleBorder(
borderRadius: BorderRadius.circular(25),
),
),
child: Row(
children: [
Icon(Icons.person_add_alt),
SizedBox(
width: 5,
),
Text('Follow')
],
)),
),
SizedBox(
width: 5,
),
Container(
height: 40, // Atur tinggi Container sesuai kebutuhan Anda
decoration: BoxDecoration(
color: Colors.blue,
borderRadius: BorderRadius.circular(25),
),
child: ElevatedButton(
onPressed: () {
// Implement your button action here
},
style: ElevatedButton.styleFrom(
primary: Colors.transparent,
shadowColor: Colors.transparent,
shape: RoundedRectangleBorder(
borderRadius: BorderRadius.circular(25),
),
),
child: Row(
children: [
Icon(Icons.message),
SizedBox(
width: 5,
),
Text('Message')
],
)),
),
SizedBox(
width: 5,
),
Container(
height: 40, // Atur tinggi Container sesuai kebutuhan Anda
decoration: BoxDecoration(
color: Colors.blue,
borderRadius: BorderRadius.circular(25),
),
child: ElevatedButton(
onPressed: () {
// Implement your button action here
},
style: ElevatedButton.styleFrom(
primary: Colors.transparent,
shadowColor: Colors.transparent,
shape: RoundedRectangleBorder(
borderRadius: BorderRadius.circular(25),
),
),
child: Row(
children: [
Icon(Icons.settings),
SizedBox(
width: 5,
),
Text('Edit')
],
)),
)
],
),
SizedBox(
height: 24,
),
Row(
crossAxisAlignment: CrossAxisAlignment.center,
mainAxisAlignment: MainAxisAlignment.spaceEvenly,
children: [
Column(
children: [
Text(
'900',
style: TextStyle(
fontSize: 22, fontWeight: FontWeight.bold),
),
Text('Posts'),
],
),
Container(
width: 1,
height: 30,
color: Colors.black,
),
Column(
children: [
Text(
'9.204',
style: TextStyle(
fontSize: 22, fontWeight: FontWeight.bold),
),
Text('Followers'),
],
),
Container(
width: 1,
height: 30,
color: Colors.black,
),
Column(
children: [
Text(
'300',
style: TextStyle(
fontSize: 22, fontWeight: FontWeight.bold),
),
Text('Following'),
],
),
],
),
ListView.builder(
padding: EdgeInsets.only(
top: 30,
left: 10,
right: 10
),
itemCount: 5,
shrinkWrap: true,
physics: NeverScrollableScrollPhysics(),
itemBuilder: (_, item) {
return Card(
shape: RoundedRectangleBorder(
borderRadius: BorderRadius.circular(10),
),
child: Padding(
padding: const EdgeInsets.only(
top: 16, left: 16, right: 16, bottom: 16),
child: Container(
height: 130,
child: Row(
children: [
Expanded(
child: Column(
mainAxisAlignment: MainAxisAlignment.start,
crossAxisAlignment: CrossAxisAlignment.start,
children: [
Text(
'Remembers what user said earlier in the conversation',
style: TextStyle(
fontSize: 16,
fontWeight: FontWeight.bold),
maxLines: 2,
overflow: TextOverflow.ellipsis,
),
SizedBox(
height: 8,
),
Text(
'Hello everyone, back again at sahretech. On this occasion, we will learn',
style: TextStyle(fontSize: 12),
maxLines: 3,
overflow: TextOverflow.ellipsis,
),
SizedBox(
height: 8,
),
Row(
children: [
Icon(
Icons.bookmark_outline,
size: 23,
),
Icon(
Icons.share_outlined,
size: 23,
),
],
)
],
),
),
SizedBox(
width: 10,
),
Container(
width: 120,
height: 120,
decoration: BoxDecoration(
color: Colors.grey,
borderRadius: BorderRadius.circular(10),
image: DecorationImage(
fit: BoxFit.cover,
image: NetworkImage(
'https://cdn.pixabay.com/photo/2023/04/02/23/08/ai-generated-7895586_1280.jpg'),
))),
],
),
),
),
);
},
)
],
),
),
),
],
));
}
} |
| Profile Page |
| Baca Artikel Lain ✨ |
| 📰 1. Membuat Restful Api di Laravel Tanpa Library Tambahan Part 1 read more |
| 📰 2. Menampilkan Data dengan API dan Token di Laravel Part 2 read more |
|
📰 3. Cara Membuat Custom Registrasi dan Prosesnya di Laravel Part
1 read more |
|
📰 4. Cara Membuat Custom Login di Laravel Part 2 read more |


No comments
Jangan lupa kasih komentar ya!. Karena komentar kalian membantu kami menyediakan informasi yang lebih baik
Tidak boleh menyertakan link atau promosi produk saat berkomentar. Komentar tidak akan ditampilkan. Hubungi 081271449921(WA) untuk dapat menyertakan link dan promosi